
Preparation is key to laying a tiled floor that looks great and lasts. Make certain the subfloor is sound, clean, and level. Choose durable tiles and compatible adhesives, and gather essential tools like tile cutters and spacers. Start installation from a centerline, check alignment, and use spacers for uniformity. Grout carefully and clean excess promptly. Regular maintenance with pH-neutral cleaners is important. By following these detailed steps, one can discover more about achieving a long-lasting tile floor.
Key Takeaways
- Ensure the subfloor is level the tiles, clean, and free from moisture to provide a solid foundation for tile installation.
- Select durable tiles like ceramic and choose adhesives compatible with both the tile and subfloor material.
- Use tile spacers for consistent gaps and regularly check alignment when laying tiles for a professional finish.
- Apply grout evenly and clean excess promptly to prevent haze, ensuring tiles maintain their appearance.
- Regularly clean with pH-neutral cleaners and apply sealant for protection and longevity of the tiles and grout.
How to Prepare Your Subfloor for Tile Installation?
Before beginning install tile, it is essential to select a tile type that suits the intended use and location, whether ceramic, porcelain, or natural stone, each offering distinct durability and aesthetic qualities.
The subfloor must be structurally sound, level, and clean to guarantee proper adhesion of the tiles; this may involve reinforcing weak areas or applying a levelling compound.
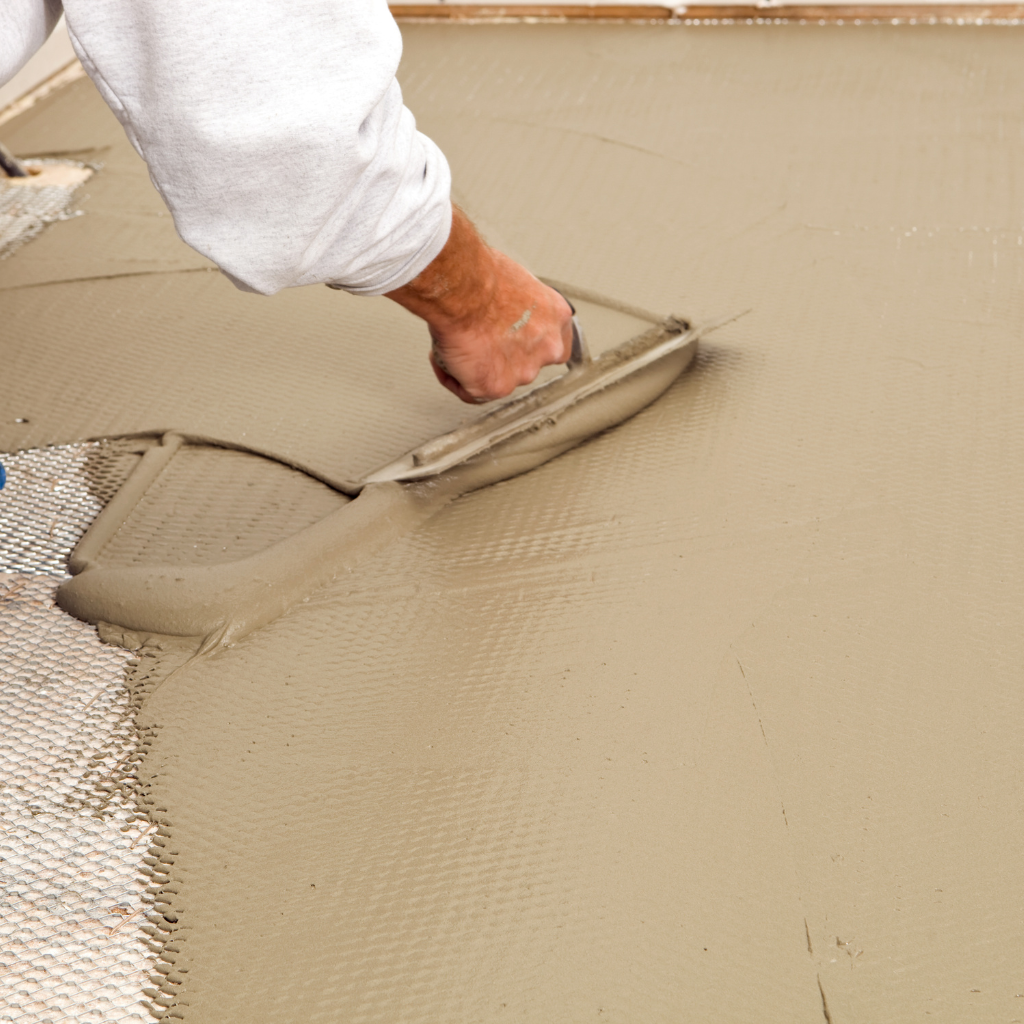
Additionally, using a tile trowel is vital for evenly spreading adhesive, which is key for achieving a uniform and long-lasting tile floor.
What type of tile is best for your floor?
When selecting the best type of tile for your floor, considering factors such as durability, style, and maintenance requirements is vital to guarantee long-term satisfaction and functionality.
For high-traffic areas, a robust tile floor is recommended. Ceramic tile is a popular choice due to its durability and diverse tile design options.
The type of tile chosen must also align with the subfloor’s structural integrity to prevent future issues during tile installation. Using appropriate tile to ensures that both floor and wall tiles remain secure and in place.
A smooth tile surface is essential for aesthetic appeal and functionality.
- Durability: Choose tiles that can withstand wear and tear.
- Style: Select a design that complements the room’s decor.
- Maintenance: Opt for tiles that are easy to clean and maintain.
- Compatibility: Make sure the tile is suitable for bond to the subfloor material.
How do you ensure your subfloor is ready for tile installation?
Selecting the right type of tile is a critical step, but guaranteeing the subfloor is adequately prepared for tile installation is equally important.
Begin by evaluating the subfloor’s condition; it must be clean, dry, and structurally sound. Remove any debris and repair any damage.
To prepare a floor for tile, consider attaching a backer board to the floor, which provides a stable surface. Ascertain the subfloor is level to prevent uneven tiles. Use a levelling compound if necessary. This guarantees the mortar for the tile will bond effectively to the subfloor.
Before installing, double-check the floor using a level tool to confirm flatness. Proper preparation will facilitate a successful tile floor installation, ensuring durability and longevity.
Do you need to use a tile trowel?
Why is a tile trowel indispensable in tile installation? A tile trowel guarantees even distribution of tile adhesive, which is vital when preparing a floor for tile. It helps create a uniform surface, facilitating proper bonding between the tile and subfloor.
To install a tile floor effectively, use the trowel to spread adhesive consistently before laying each tile.
- Tile Adhesive Application: A tile trowel guarantees the adhesive is evenly spread, preventing voids under the tiles.
- The surface of the Tile: It facilitates a smooth and level surface, which is essential for pressing the tile firmly.
- Grout Joints: Proper adhesive application aids in achieving clean grout lines.
- Tile Spacers: When used with a trowel, spacers maintain uniform distance, guaranteeing precision in alignment.
What Tools Do You Need to Lay a Tile Floor?
Specific tools are essential to guarantee precision and quality in tile installation. A tile cutter is vital to take clean, accurate cuts, while tile spacers help maintain consistent gaps for grout.
Additionally, a grout float is necessary for evenly applying grout, guaranteeing a smooth finish and strong adhesion.
How to use a tile cutter effectively?
Mastering the use of a tile cutter to cut is essential for achieving the clean, precise cuts necessary for a professional-looking tile floor installation.
Choosing the right tool—manual tile cutter, wet tile saw, or tile nipper—depends on the size of the tile and the complexity of cuts required.
When a straight cut across the floor is needed, a tile cutter offers an efficient solution. For intricate shapes or small pieces of tile, a tile nipper may be more appropriate.
If you need to cut a tile with precision, using a wet tile saw can prevent chipping and guarantee accuracy.
- Manual Tile Cutter: Ideal for straight cuts on ceramic tiles.
- Wet Tile Saw: Effective for large tiles and delicate materials.
- Tile Nipper: Best for small, intricate cuts.
- Safety Gear: Always crucial during tile cutting operations.
Why are tile spacers important?
Tile spacers are fundamental components in the tiling process, guaranteeing uniformity and precision in the layout of a tile floor. When initiating a new tile floor project, these small, often overlooked tools determine the success of the installation.
Tile spacers maintain consistent spaces between the tiles, which is essential for even grout lines and an aesthetically pleasing finish. As one lays floor tiles, spacers guide the tile layout, providing symmetry and alignment throughout the space.
Proper spacing is critical, as it prevents tiles from shifting during installation and assures stability. By incorporating tile spacers, individuals can confidently lay the tile, knowing that their tile project will withstand the test of time.
Ultimately, tile spacers are indispensable for a flawless, professional-looking installation.
What is the role of a grout float in tile install?
In the intricate process of tile installation, the grout float serves as an essential tool for achieving a smooth and cohesive finish. It is primarily used to apply tile grout, pressing it into the joints between tiles after using spacers between each tile to guarantee tiles are evenly spaced.
To lay a tile floor effectively, the installer must follow the tile pattern and remove excess grout promptly to prevent staining the surface of ceramic tiles. A rubber mallet is recommended for gently tapping tiles into place before grouting.
- Choose a high-quality grout float that assures durability and ease of use.
- Apply grout at a 45-degree angle: This technique prevents air pockets.
- Use a damp sponge for cleanup: Essential for smooth grout lines.
- Inspect grout lines regularly: Secures uniformity and adhesion.
How to Lay Floor Tiles Efficiently: Key Tips on How to Tile a Floor
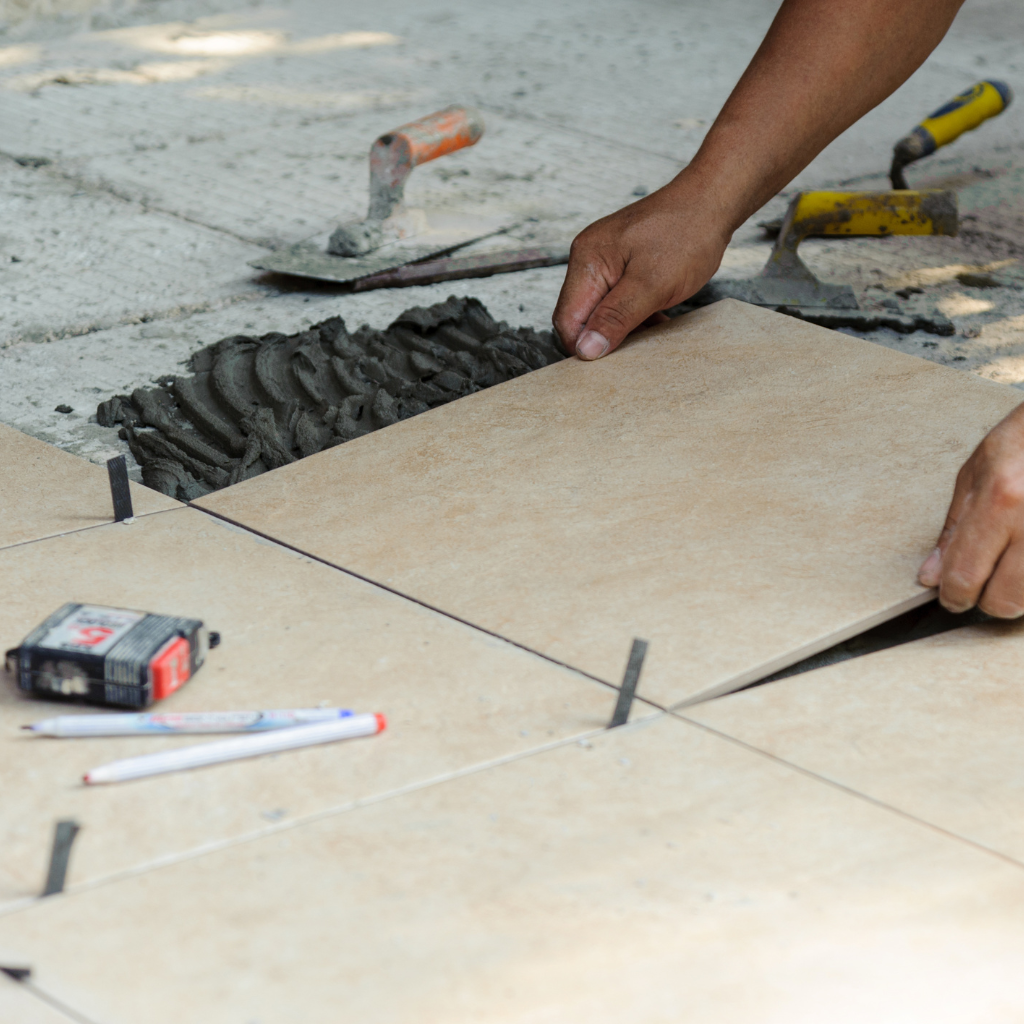
To achieve an efficient and aesthetically pleasing tile installation, begin by accurately placing the first tile to establish a reference point, ensuring alignment and symmetry.
Selecting an ideal tile layout is vital, as it affects both visual impact and material efficiency; consider patterns like grid, diagonal, or herringbone based on the room’s dimensions and focal points.
Additionally, precision in cutting tiles to fit around edges and obstacles is essential, requiring the use of a wet saw or tile cutter for clean, accurate cuts.
How do you lay the first tile properly?
Properly laying the first tile is vital for achieving a professional and aesthetically pleasing finish. To begin, one must prepare the surface and identify the center of the room, guaranteeing the layout is balanced.
Start laying the first tile from this center point, aligning it with a chalk line for precision. Guaranteeing a consistent gap between the tile and the wall is essential, so use tile spacers to maintain uniformity.
Apply adhesive to the back of the tile for secure placement.
- Determine the room’s center: This guarantees the layout is balanced.
- Use tile spacers: They help maintain even spacing.
- Apply adhesive properly: Guarantees the tile stays in place.
- Anticipate the last tile placement: Plan to avoid awkward cuts.
What is the best tile layout for your space?
After securing the first tile in place, selecting the best tile layout becomes a strategic step to optimize both the functionality and aesthetic appeal of the space. Begin by determining the room’s centre so that the floor tiles are laid systematically. This approach, known as “tile from the center,” guarantees that full tiles dominate visible areas, enhancing symmetry.
| Step | Action | Purpose |
|---|---|---|
| 1 | Find room center | Guarantees balanced tile layout |
| 2 | Lay all full tiles | Maximizes use of full tiles in main space |
| 3 | Plan next tile placement | Prepares for efficient installation process |
| 4 | Adjust for tiles to fit | Minimizes cuts and guarantees seamless edge fitting |
This method provides a polished appearance when installing floor tiles, facilitating precise placement for the next tile.
How to cut tile to fit around the edges?
Cutting tiles to fit around edges requires meticulous planning and precise execution to guarantee a seamless finish. A tile cutter is essential to cut tiles around obstacles like corners and fixtures. When dealing with tougher materials or intricate cuts, a tile saw provides the precision needed.
Before laying tiles directly on the floor, measure the space accurately, accounting for the tile face and spacing.
- Use tile spacers to maintain uniform gaps between tiles, assuring a professional look.
- Align with the existing floor to maintain consistency and elevation, especially on a bathroom floor.
- Employ a trowel for even adhesive application before placing cut tiles.
- Prioritize dry fitting to verify cuts and adjustments before permanent placement.
This approach ensures a durable and visually appealing tile installation.
What Are the Best Practices for Grouting Your Tile Floor?
Selecting the appropriate tile grout is essential for both the aesthetic and durability of your tile floor; consider factors such as colour, sanded versus unsanded, and water resistance.
To achieve a smooth finish, evenly apply grout with a rubber float, ensuring it fills all joints and removing any excess before it begins to harden.
Finally, promptly clean off residual grout with a damp sponge, wiping diagonally across tiles to prevent the grout from being pulled out of the joints.
How to Choose the Right Tile Grout to Tile a Bathroom Floor
Selecting the appropriate tile grout is essential for any tile floor installation, whether you’re preparing a floor, tiling a bathroom floor, or tackling a DIY tile project. The right grout not only secures longevity but also complements tile to the wall and overall design.
Consider these factors:
- Type of Grout: Choose between sanded or unsanded grout depending on tile spacing.
- Colour Selection: Match or contrast grout color with tiles to enhance visual impact.
- Water Resistance: Opt for grout with additives for moisture-prone areas like bathrooms.
- Durability: Evaluate the grout’s ability to withstand wear and tear to allow the tiles to remain intact.
Selecting correctly will guarantee both function and style.
How to apply grout to ensure a smooth finish?
To achieve a smooth and professional finish when applying grout to a tile floor, it is essential to follow a systematic approach that guarantees uniformity and durability.
Begin by confirming that the tile floor is thoroughly dry and clean, as any debris can affect the grout’s adhesion.
Mix the grout according to the manufacturer’s instructions provided in the tile box, achieving a consistency similar to peanut butter.
Use a rubber float to apply grout at a 45-degree angle, pressing firmly to fill the joints. Wipe off excess grout with a damp sponge, being careful not to disturb the grout lines. Allow the grout to set for the recommended time to confirm a smooth finish. Understanding know how to tile floor involves mastering these grouting techniques.
How to clean excess grout off tiles?
Efficiently cleaning excess grout off tiles is essential for achieving a polished and professional appearance.
After applying grout, it is critical to promptly address grout removal to prevent grout haze from forming on the tile surface. Utilize a damp sponge to wipe away grout residue, guaranteeing the sponge is rinsed frequently to maintain effectiveness.
- Grout Residue Timing: Begin cleaning tiles after the grout has set slightly, typically 15-30 minutes post-application.
- Use of Grout Cleaner: For stubborn grout haze, apply a specialized grout cleaner following the manufacturer’s instructions.
- Gentle Circular Motion: Employ a gentle, circular motion with the damp sponge to avoid disturbing grout lines.
- Final Rinse: Perform a final clean with fresh water to guarantee clean tiles and a pristine finish.
Implementing these steps guarantees lasting, visually appealing results.
How to Maintain Your New Tile Floor?
To guarantee the longevity of a ceramic tile floor, regular cleaning with a pH-neutral cleaner is recommended to prevent the buildup of dirt and grime.
Applying a high-quality sealant to both tile and grout can effectively guard against staining and discolouration.
If a tile becomes loose, promptly address the issue by reapplying the adhesive and allowing adequate curing time to prevent further displacement.
What are the best cleaning practices for a ceramic tile floor?
When maintaining a ceramic tile floor, understanding the best cleaning practices is essential for preserving its appearance and longevity.
Regular maintenance involves using a damp cloth to clean the tile surface, which helps remove the stain without causing damage.
Avoid harsh chemicals that could deteriorate the ceramic or grout. Instead, opt for gentle cleaning agents.
Using a mop with mild detergent can help maintain cleanliness without compromising the tile floor.
Sealing grout periodically is vital to prevent dirt accumulation and enhance its lifespan.
- Regular Maintenance: Implement a consistent cleaning schedule to prevent dirt buildup.
- Avoid Harsh Chemicals: Use gentle, pH-neutral cleaners to protect the ceramic and grout.
- Mop Regularly: Employ a soft mop with mild detergent for effective cleaning.
- Sealing Grout: Periodically seal grout to prevent staining and maintain durability.
How do you prevent tile adhesive and grout from staining?
Many homeowners find that preventing stains on tile and grout requires a combination of proactive measures and regular upkeep.
After learning how to tile a floor and how to install your tile floor, applying a high-quality sealant is vital for stain prevention. This forms a protective barrier on both tile and grout, minimizing the absorption of moisture and dirt.
Regular cleaning is important; use a damp mop with a pH-neutral cleaner to avoid damaging surfaces. In high-moisture areas like the bathroom, proper ventilation is guaranteed to reduce humidity.
Routinely checking for cracks or gaps in grout can prevent further staining. Consistent maintenance by wiping spills immediately and gently scrubbing stubborn spots guarantees the longevity and aesthetics of the tile onto the floor.
What to do when a tile doesn’t stay in place?
Securing a tile that refuses to stay in place requires careful assessment and precise action.
When a tile doesn’t adhere properly, begin by inspecting the subfloor for levelness and structural integrity. Proper preparation before laying is essential. Make sure that the subfloor is even and free from debris.
- Adhesive Choice: Select an adhesive suited for the specific tile and subfloor material.
- Curing Time: Allow sufficient curing time as per the adhesive manufacturer’s instructions to guarantee strong bonding.
- Grout Application: Apply grout correctly to prevent movement and fill gaps.
- Maintenance: Regular maintenance helps to identify and rectify issues early, making certain tiles remain in place.
Correct installation and ongoing maintenance are critical for longevity and aesthetic appeal.

Conclusion
In summary, achieving a durable and visually appealing tile floor requires meticulous preparation, the right tools, and precise execution. Confirming the subfloor is properly prepared sets the foundation for success. Utilizing the appropriate tools and following efficient tile-laying techniques enhances both speed and quality. Grouting with care guarantees longevity and a polished finish. Finally, regular maintenance, including cleaning and sealing, preserves the tile’s appearance and functionality, assuring the floor remains a lasting and beautiful feature of any space.